


How to create an MPA in ASP.NET Core Web App ready for modern Front-end
with Webpack, Yarn & ASP.NET (7) MVC Core


These last years I had a client who needed to create an MPA (multiple-page application) based on ASP.NET MVC 5 using vanilla javascript as a requirement. The project was already started when I join, and jQuery and jQuery plugins were used all over the place altogether with other libraries that were referenced using the ASP.NET bundling system.
This was a project with amazing predicted scope and social impacts so I was really enthusiastic about it. I prepared myself as the lead front-end developer for the challenges of making reliable, fast, and robust screens. Whatsoever, whilst dealing with the building of this heavyweight SPA (single page application) alike screens, I was short on tools and technologies to help me and the team to accomplish it.
So, why not, let's create a module referencing mechanism, I thought. Then a two-way binding mechanism, and let's add sass so we can have a better way of making the styles...
This project was big, and when I look back I feel blessed with the opportunity of facing so many challenges, but there is another way, and I believe a better one...
Default ASP.NET Core Project Templates
From .Net we get several project templates. Starting out is easy: either you choose the web template, which gives you an almost empty project, or you can opt for more boilerplate by choosing the MVC or Web App template.
Both have their characteristics:
dotnet new web
This gives you pretty much nothing. What's not necessarily a bad thing if you are up for configuring everything from scratch.
dotnet new mvc #produces a Model-View-Controller project
dotnet new webapp # produces a Page-based project
These two options give you an MPA right away, but the front-end libraries (jQuery and jQuery Validations) are bundled with the project, which does not provide a lot of room for change.
What we are about to do
We are going to set up an ASP.NET Core Web App (Model-View-Controller) project with custom front-end dependencies.
We will set up Webpack for the front-end bundling and build process.
We will set up Yarn for the dependencies and package management.
We will be making sure Bootstrap is a dependency of the client project instead of a part of the project.
We will minimize the use of jQuery only by referencing it from ASP.NET's form validation when needed.
We will separate the build artifacts from the client source code.
We will streamline the build process of the front-end and back-end parts of the project.
Creating the project
You can opt for different choices along the way. I believe the process will be very similar, for instance, if you opt for the webapp project template instead the mvc template, or if you prefer to use NPM instead of Yarn.
In either case, you will need:
A recent version of the .NET SDK (I'm using version 7.0.1.1)
NodeJs installed (I'm using version 18.12.1)
Yarn (I'm using version 3.3.1)
I use a combination of VS Code, Visual Studio 22 community edition, and the terminal.
This is not intended to be a step-by-step guide, just a set of remarks on my process. However, I will try to be as clear as possible so you can do this by yourself from beginning to end.
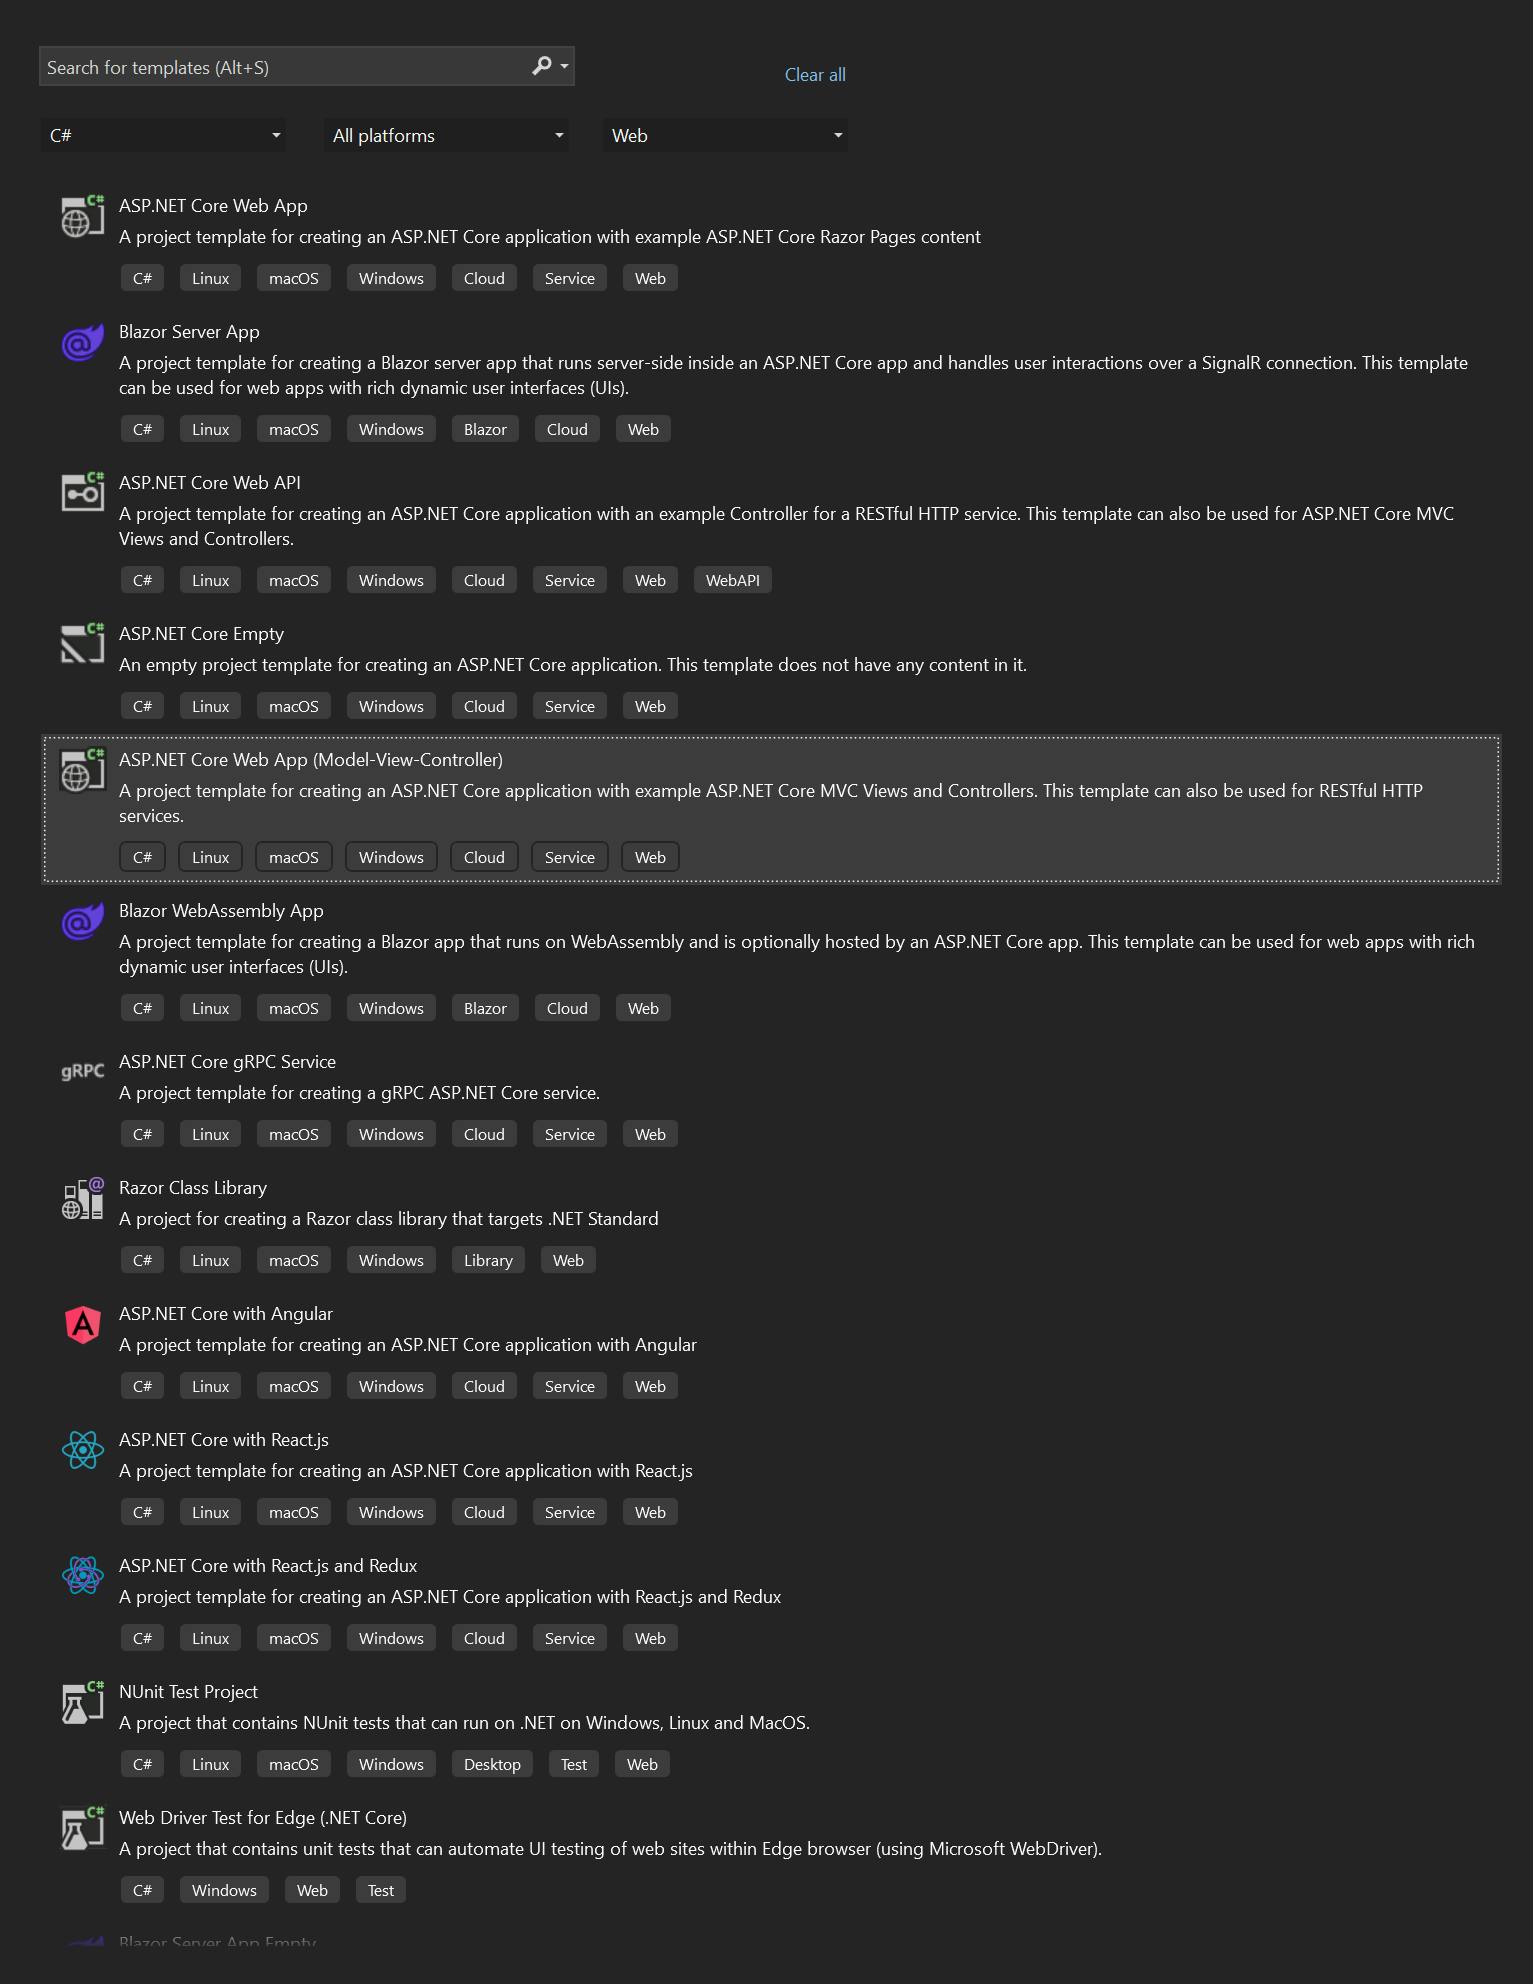
Let's then create a new MVC project using the ASP.NET Core Web App (Model-View-Controller) template. Navigate to a new empty directory and enter the following:
dotnet new mvc
Or inside Visual Studio you can create a new project by choosing like in the picture below:
I will end up using Visual Studio while working on this project and if you want your solution in the same folder as your project you should create it using Microsoft's IDE. I will prefer to use the terminal for this type of task and this will be my approach from now on in the article. Hope you don't mind...
Default Code Cleanup
Altho we will replicate the same project output, the content will have some changes. So first of all, just remove directories wwwroot/css, wwwroot/js, and wwwroot/lib. Also, removeViews/Shared/_Layout.cshtml.css, and Views/Shared/_ValidationScriptsPartial.cshtml.
Next up, create a new directory for your client app project at the root of your MVC project. Following the .NET Conventions I will name it ClientApp.
Adding Yarn as the Package manager
I have been using yarn since npm was giving me a lot of headaches in the past. By using yarn I minimize the number of issues while managing all my frontend project packages. If you want a more detailed overview of why I use yarn, you can read Yarn's features on its official site.
I don't remember how I installed yarn since I did it years ago. Sure you can read how to do it here.
After having yarn installed, go inside the ClientApp directory, and type on the terminal:
yarn init -2
By default, this will set up your project to be compatible with Zero-Installs, which requires checking-in yarn cache in your repository. However, I do prefer to set the repository after having a clean solution. So for now, we will skip this step.
Any time you will want to update Yarn to the latest version, just run:
yarn set version stable
Defining front-end dependencies
If you look inside our ClientApp folder, you will notice yarn has created a package.json file. Now is the time to create it in the correct way:
npm init
Of course, it is up to you what name, description, license, and author you choose to enter when prompted. The only remark here is that you should remove the line for the entry point("main": "index.js"), due to Webpack will take care of it later and making this package private by adding "private": true.
For my MIT licensed projects I like to include the LICENSE.txt file in the root of the solution.
MIT License

Copyright (c) [year] [fullname]

Permission is hereby granted, free of charge, to any person obtaining a copy
of this software and associated documentation files (the "Software"), to deal
in the Software without restriction, including without limitation the rights
to use, copy, modify, merge, publish, distribute, sublicense, and/or sell
copies of the Software, and to permit persons to whom the Software is
furnished to do so, subject to the following conditions:

The above copyright notice and this permission notice shall be included in all copies or substantial portions of the Software.

THE SOFTWARE IS PROVIDED "AS IS", WITHOUT WARRANTY OF ANY KIND, EXPRESS OR
IMPLIED, INCLUDING BUT NOT LIMITED TO THE WARRANTIES OF MERCHANTABILITY,
FITNESS FOR A PARTICULAR PURPOSE AND NONINFRINGEMENT. IN NO EVENT SHALL THE
AUTHORS OR COPYRIGHT HOLDERS BE LIABLE FOR ANY CLAIM, DAMAGES OR OTHER
LIABILITY, WHETHER IN AN ACTION OF CONTRACT, TORT OR OTHERWISE, ARISING FROM,
OUT OF OR IN CONNECTION WITH THE SOFTWARE OR THE USE OR OTHER DEALINGS IN THE
SOFTWARE.
Once the package.json is properly initialized, go ahead and add the default MVC dependencies by typing:
yarn add jquery jquery-validation jquery-validation-unobtrusive bootstrap @popperjs/core
This will include:
Bootstrap 5 & Popper
jQuery 3 & jQuery validation
Remember this way of adding dependencies to the client app in the future. No more links to statics (downloaded) distribution files. Now we can get everything directly from npm.
The Client App
The project should look like the picture below after all the previous work done:
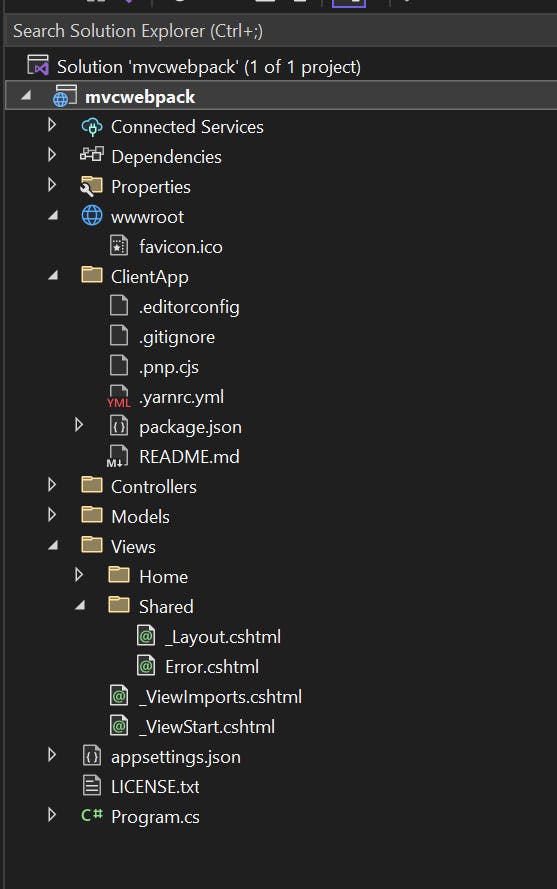
Let's keep things simple and create another two folders inside ClientApp for the styles and the javascript (behavioral) code. I choose to name it css and js respectively.
By default, all the styles were on the wwwroot/css/site.css and Views/Shared/_Layout.cshtml.css. Now these two files are gone for good so let's create some files inside our styles folder whit the same content:
ClientApp/src/css/site.css
html {
    font-size: 14px;
}

@media (min-width: 768px) {
    html {
        font-size: 16px;
    }
}

.btn:focus, .btn:active:focus, .btn-link.nav-link:focus, .form-control:focus, .form-check-input:focus {
    box-shadow: 0 0 0 0.1rem white, 0 0 0 0.25rem #258cfb;
}

html {
    position: relative;
    min-height: 100%;
}

body {
    margin-bottom: 60px;
}
ClientApp/src/css/layout.css
a.navbar-brand {
    white-space: normal;
    text-align: center;
    word-break: break-all;
}

a {
    color: hsl(204deg 100% 50%);
}

.btn-primary {
    color: #fff;
    background-color: hsl(204deg 100% 50%);
    border-color: #1861ac;
}

.nav-pills .nav-link.active, .nav-pills .show > .nav-link {
    color: #fff;
    background-color: #1b6ec2;
    border-color: #1861ac;
    border-color: red;
}

.border-top {
    border-top: 1px solid #e5e5e5;
    border-top: 1px solid red;
}

.border-bottom {
    border-bottom: 1px solid #e5e5e5;
    border-bottom: 1px solid red;
}

.box-shadow {
    box-shadow: 0 .25rem .75rem rgba(0, 0, 0, .05);
}

button.accept-policy {
    font-size: 1rem;
    line-height: inherit;
}

.footer {
    position: absolute;
    bottom: 0;
    width: 100%;
    white-space: nowrap;
    line-height: 60px;
}
This will mimic exactly the same we get from the default template.
Now let's focus on creating the javascript files.
ClientApp/src/js/site.js
import './bootstrap.js';
import 'bootstrap/dist/css/bootstrap.css';

import '../css/site.css';
import '../css/layout.css';

console.log("The 'site' bundle has been loaded");
ClientApp/src/js/bootstrap.js
import '@popperjs/core';
import 'bootstrap';

console.log("The 'bootstrap' bundle has been loaded");
ClientApp/src/js/validation.js
import 'jquery';
import 'jquery-validation';
import 'jquery-validation-unobtrusive';

console.log("The 'Validation' bundle has been loaded")
And because our default template comes with a default Home Controller and Views, let's create a Javascript home module too:
ClientApp/src/js/home.js
console.log("The 'home module' bundle has been loaded");
// I know this is empty but still this can serve as a good example!
Notice that all the files were imported using the ES6 module import syntax. These imports are static, which means they are executed at parse time, therefore all the imports are "hoisted". This import syntax can't be used in a different place than the top of each file.
Adding Webpack for bundling
As the official Webpack site says, Webpack is used to compile javascript modules. We already have javascript modules and styles ready to be bundled. Also, we have a package.json with all the project front-end dependencies, and yarn as our package manager. So, if you go to the getting started from Webpack, you will notice we are on the right track.
To continue, we will add Webpack and some other development dependencies to our project by typing on the terminal inside ClientApp:
yarn add -D webpack webpack-cli mini-css-extract-plugin css-loader json5
As of version 4, Webpack doesn't require any configuration, but our project will need some setup to prevent that every time a page is loaded or refreshed, all the styles bundles reload, resulting in an unpleasant style glitch. That's why we install the MiniCSSExtractPlugin alongside Webpack.
Also, we will take care of our output directory dist in wwwroot where all our compiled source files will be put. We will configure a parser for our JSON files so now we can also use the human version of JSON which allows comments, but this is not necessary at all. Finally, we will define some rules for our images and font files.
webpack.config.js
const path = require("path");
const json5 = require("json5");
const MiniCssExtraPlugin = require("mini-css-extract-plugin");

module.exports = {
    entry: {
        site: "./src/js/site.js",
        bootstrap: './src/js/bootstrap.js',
        validation: './src/js/validation.js',
        home: './src/js/home.js'
    },
    output: {
        filename: "[name].bundle.js",
        path: path.resolve(__dirname, '..', 'wwwroot', "dist"),
    },
    devtool: 'source-map',
    mode: 'development',
    module: {
        rules: [
            {
                test: /\.css$/i,
                use: [{ loader: MiniCssExtraPlugin.loader }, "css-loader"],
            },
            {
                test: /\.(png|svg|jpg|jpeg|gif)$/i,
                type: "asset/resource",
            },
            {
                test: /\.(woff|woff2|eot|ttf|otf)$/i,
                type: "asset/resource",
            },
            {
                test: /\.json5$/i,
                type: "json",
                parser: {
                    parse: json5.parse,
                },
            },
        ],
    },
    plugins: [
        new MiniCssExtraPlugin({
            filename: "[name].css"
        })
    ]
};
Now it is time to make the physical references in our View files so let's review and add some extra code to check all the functionalities later on.
Adding a Contact Form
How we will try out the unobtrusive validation from MVC? We will need a form for that so let's add some Contact Form functionalities to the project.
Models/ContactViewModel.cs
using System.ComponentModel.DataAnnotations;

namespace Dandelion.NET.Core.MVC.MPA.Models
{
    public class ContactViewModel
    {
        [Required, StringLength(30, MinimumLength = 2)]
        public string Subject { get; set; }

        [Required(ErrorMessage = "Please enter a message")]
        public string Message { get; set; }
    }
}
Controllers/HomeController.cs
using Dandelion.NET.Core.MVC.MPA.Models;
using Microsoft.AspNetCore.Mvc;
using System.Diagnostics;

namespace Dandelion.NET.Core.MVC.MPA.Controllers
{
    public class HomeController : Controller
    {
        private readonly ILogger<HomeController> _logger;

        public HomeController(ILogger<HomeController> logger)
        {
            _logger = logger;
        }

        public IActionResult Index()
        {
            return View();
        }

        public IActionResult Privacy()
        {
            return View();
        }

        [ResponseCache(Duration = 0, Location = ResponseCacheLocation.None, NoStore = true)]
        public IActionResult Error()
        {
            return View(new ErrorViewModel { RequestId = Activity.Current?.Id ?? HttpContext.TraceIdentifier });
        }

        [HttpGet]
        public IActionResult Contact()
        {
            return View();
        }

        [HttpPost]
        public IActionResult Contact(ContactViewModel viewModel)
        {
            if (ModelState.IsValid)
            {
                //TODO: Send an email or save the message in a table...
                return RedirectToAction("Index");
            }
            return View();
        }
    }
}
We just add the last two actions to the default content.
Views/Home/Contact.cshtml
@model ContactViewModel

@{
    ViewBag.Title = "Contact";
    Layout = "_Layout";
}

@section Scripts {
    <script src="~/dist/validation.bundle.js" defer></script>
}

<h1>@ViewBag.Title</h1>

<form asp-controller="Home" asp-action="Contact">
    <div class="mb-3">
        <label asp-for="Subject" class="form-label"></label>
        <input asp-for="Subject" class="form-control" />
        <span asp-validation-for="Subject" class="small text-danger"></span>
    </div>

    <div class="mb-3">
        <label asp-for="Message" class="form-label"></label>
        <textarea asp-for="Message" class="form-control"></textarea>
        <span asp-validation-for="Message" class="small text-danger"></span>
    </div>

    <button class="btn btn-primary" type="submit">Submit</button>
</form>
Final touches
Our work is almost done, now we need to review the other view files so we can reference the bundles and add some minor changes to the default content.
Views/Home/index.cshtml
@{
    ViewData["Title"] = "Home Page";
}
@section Scripts {
    <script src="~/dist/home.bundle.js" defer></script>
}

<div class="text-center">
    <h1 class="display-4">Welcome</h1>
    <p>Learn about <a href="https://docs.microsoft.com/aspnet/core">building Web apps with ASP.NET Core</a>.</p>
</div>
Here the important part is the content of the Scripts section, where we reference the home bundle. Note the defer keyword on the script tag, which on true, is meant to be executed after the document has been parsed, but before firing the DOMContentLoaded event.
Views/Shared/_Layout.cshtml
@{
ViewBag.AppName = "Dandelion MPA";
}
<!DOCTYPE html>
<html lang="en">
<head>
<meta charset="utf-8" />
<meta name="viewport" content="width=device-width, initial-scale=1.0" />
<title>@ViewData["Title"] - Dandelion.NET.Core.MVC.MPA</title>
<link rel="stylesheet" href="~/dist/site.css" />
<script src="~/dist/site.bundle.js" defer></script>
@await RenderSectionAsync("Scripts", required: false)
</head>
<body>
<header>
<nav class="navbar navbar-expand-sm navbar-toggleable-sm navbar-light bg-white border-bottom box-shadow mb-3">
<div class="container-fluid">
<a class="navbar-brand" asp-area="" asp-controller="Home" asp-action="Index">@ViewBag.AppName</a>
<button class="navbar-toggler" type="button" data-bs-toggle="collapse" data-bs-target=".navbar-collapse" aria-controls="navbarSupportedContent"
aria-expanded="false" aria-label="Toggle navigation">
<span class="navbar-toggler-icon"></span>
</button>
<div class="navbar-collapse collapse d-sm-inline-flex justify-content-between">
<ul class="navbar-nav flex-grow-1">
<li class="nav-item">
<a class="nav-link text-dark" asp-area="" asp-controller="Home" asp-action="Index">Home</a>
</li>
<li class="nav-item">
<a class="nav-link text-dark" asp-area="" asp-controller="Home" asp-action="Contact">Contact</a>
</li>
<li class="nav-item">
<a class="nav-link text-dark" asp-area="" asp-controller="Home" asp-action="Privacy">Privacy</a>
</li>
</ul>
</div>
</div>
</nav>
</header>
<div class="container">
<main role="main" class="pb-3">
@RenderBody()
</main>
</div>
<footer class="border-top footer text-muted">
<div class="container">
© 2022 - @ViewBag.AppName - <a asp-area="" asp-controller="Home" asp-action="Privacy">Privacy</a>
</div>
</footer>
</body>
</html>
The use of the attribute defer in our script tags allows us to move all the scripts to the head section of the document safely. The Contact link was added to the default menu. All links for the styles and behavior bundles were properly set.
The building process
Now that all our content is defined we are ready to define the building process on the visual studio project file. But before, we will need to add the Microsoft.AspNetCore.SpaServices.Extensions.
Navigate up if you are still in the ClientApp. This command must be typed while in the root directory of your project:
dotnet add package Microsoft.AspNetCore.SpaServices.Extensions
Then if you are in Visual Studio 2022 you can double-click the project name or just edit the project file as follow:
Dandelion.NET.Core.MVC.MPA.csproj
<Project Sdk="Microsoft.NET.Sdk.Web">

    <PropertyGroup>
        <TargetFramework>net7.0</TargetFramework>
        <Nullable>enable</Nullable>
        <ImplicitUsings>enable</ImplicitUsings>
        <IsPackable>false</IsPackable>
        <_MpaRoot>ClientApp\</_MpaRoot>
        <_PublicDirectory>wwwroot\</_PublicDirectory>
        <DefaultItemExcludes>$(DefaultItemExcludes);$(_MpaRoot).yarn\**</DefaultItemExcludes>
    </PropertyGroup>

    <ItemGroup>
        <PackageReference Include="Microsoft.AspNetCore.SpaServices.Extensions" Version="7.0.1" />
    </ItemGroup>

    <ItemGroup>
        <!-- Don't publish the MPA source files, but do show them in the project files list -->
        <Content Remove="$(_MpaRoot)**"/>
        <None Remove="$(_MpaRoot)**"/>
        <None Include="$(_MpaRoot)**" Exclude="$(_MpaRoot)node_modules\**"/>
        <!--<None Include="$(_MpaRoot)**" Exclude="$(_MpaRoot).yarn\**"/>-->
    </ItemGroup>

    <Target Name="Yarn" BeforeTargets="Build" Condition=" '$(Configuration)' == 'Debug' And !Exists('$(_MpaRoot).yarn') ">
        <!-- Ensure Node.js is installed -->
        <Exec Command="node --version" ContinueOnError="true">
            <Output TaskParameter="ExitCode" PropertyName="ErrorCode"/>
        </Exec>
        <Error Condition="'$(ErrorCode)' != '0'" Text="Node.js is required to build and run this project. To continue, please install Node.js from https://nodejs.org/, and then restart your command prompt or IDE."/>
        <Message Importance="high" Text="Adding latest 'yarn' version to the project. This may take several minutes..."/>
        <Exec WorkingDirectory="$(_MpaRoot)" Command="yarn set version stable"/>

    </Target>

    <Target Name="YarnInstall" BeforeTargets="Build" Condition=" '$(Configuration)' == 'Debug' And !Exists('$(_MpaRoot).yarn') ">
        <!-- Ensure Node.js is installed -->
        <Exec Command="node --version" ContinueOnError="true">
            <Output TaskParameter="ExitCode" PropertyName="ErrorCode"/>
        </Exec>
        <Error Condition="'$(ErrorCode)' != '0'" Text="Node.js is required to build and run this project. To continue, please install Node.js from https://nodejs.org/, and then restart your command prompt or IDE."/>
        <Message Importance="high" Text="Restoring dependencies using 'yarn'. This may take several minutes..."/>
        <Exec WorkingDirectory="$(_MpaRoot)" Command="yarn install"/>
    </Target>

    <Target Name="YarnRunBuild" BeforeTargets="Build" DependsOnTargets="Yarn;YarnInstall">
        <Exec WorkingDirectory="$(_MpaRoot)" Command="yarn build"/>
    </Target>

    <Target Name="PublishRunWebpack" AfterTargets="ComputeFilesToPublish">
        <!-- As part of publishing, ensure the JS resources are freshly built in production mode -->
        <Exec WorkingDirectory="$(_MpaRoot)" Command="yarn install"/>
        <Exec WorkingDirectory="$(_MpaRoot)" Command="yarn build"/>

        <!-- Include the newly-built files in the publish output -->
        <ItemGroup>
            <DistFiles Include="$(_PublicDirectory)dist\**"/>
            <ResolvedFileToPublish Include="@(DistFiles->'%(FullPath)')" Exclude="@(ResolvedFileToPublish)">
                <RelativePath>%(DistFiles.Identity)</RelativePath>
                <CopyToPublishDirectory>PreserveNewest</CopyToPublishDirectory>
                <ExcludeFromSingleFile>true</ExcludeFromSingleFile>
            </ResolvedFileToPublish>
        </ItemGroup>
    </Target>

    <Target Name="YarnClean" BeforeTargets="Clean">
        <Message Text="Deleting ClientApp Distribution Files" />
        <RemoveDir Directories="$(_PublicDirectory)dist"/>
        <Message Text="Deleting Yarn Files" />
        <RemoveDir Directories="$(_MpaRoot).yarn"/>
        <Delete Files="$(_MpaRoot).yarnrc.yml" />
        <Delete Files="$(_MpaRoot).pnp.cjs" />
        <Delete Files="$(_MpaRoot).pnp.loader.mjs" />
    </Target>

</Project>
This will allow us to build and install everything in both the client and the backend project. However, to be able to use Webpack live reload and server we still need to add some scripts to our package.json.
ClientApp/package.json
{
  "name": "mvc-mpa-client",
  "packageManager": "yarn@3.3.1",
  "description": "ASP.NET Core MVC Mulpti Page Application",
  "version": "1.0.0",
  "private": true,
  "scripts": {
    "build": "webpack",
    "watch": "webpack --watch"
  },
  "author": "Alex Alvarez Gárciga <aagarciga@gmail.com>",
  "license": "MIT",
  "dependencies": {
    "@popperjs/core": "^2.11.6",
    "bootstrap": "^5.2.3",
    "jquery": "^3.6.3",
    "jquery-validation": "^1.19.5",
    "jquery-validation-unobtrusive": "^4.0.0"
  },
  "devDependencies": {
    "css-loader": "^6.7.3",
    "mini-css-extract-plugin": "^2.7.2",
    "webpack": "^5.75.0",
    "webpack-cli": "^5.0.1"
  }
}
This is my final version of the file, hope you can review and complete any missing parts.
Creating a git repository
Well, this is a tricky part... We already have a git repository set in the ClientApp because of yarn and we have also a .gitignore with the yarn set up for Zero-Install.
If you want to keep two different git repositories, one for each part of the project, you can add git to the project on the root folder and ignore all the files inside the ClientApp directory.
However, we will take the approach of having just one global repository. To archive that we will remove the .git folder and the .gitignore inside the ClientApp. Then, while on the root directory of the project, let's type on the terminal:
git init
This will add the repository to the whole project with a master branch by default. Now it's up to you to remove the master branch and create a new one called main. It is what I normally do. But the important step now is to add the .gitignore file.
dotnet new gitignore
By typing this on the terminal at the root folder we will get a default .gitignore that will need to be modified for this specific setup. Please add the content below at the end of your current .gitignore file:
.gitignore
# modern yarn Zero-Installs
ClientApp/.yarn/*
ClientApp/!.yarn/cache
ClientApp/!.yarn/patches
ClientApp/!.yarn/plugins
ClientApp/!.yarn/releases
ClientApp/!.yarn/sdks
ClientApp/!.yarn/versions

ClientApp/.yarnrc.yml
ClientApp/.pnp.cjs
ClientApp/.pnp.loader.mjs

# ClientApp distribution files
wwwroot/dist/
Now you can set the origin to your own GitHub repo if you want and start with the build of the project in Visual Studio 2022.
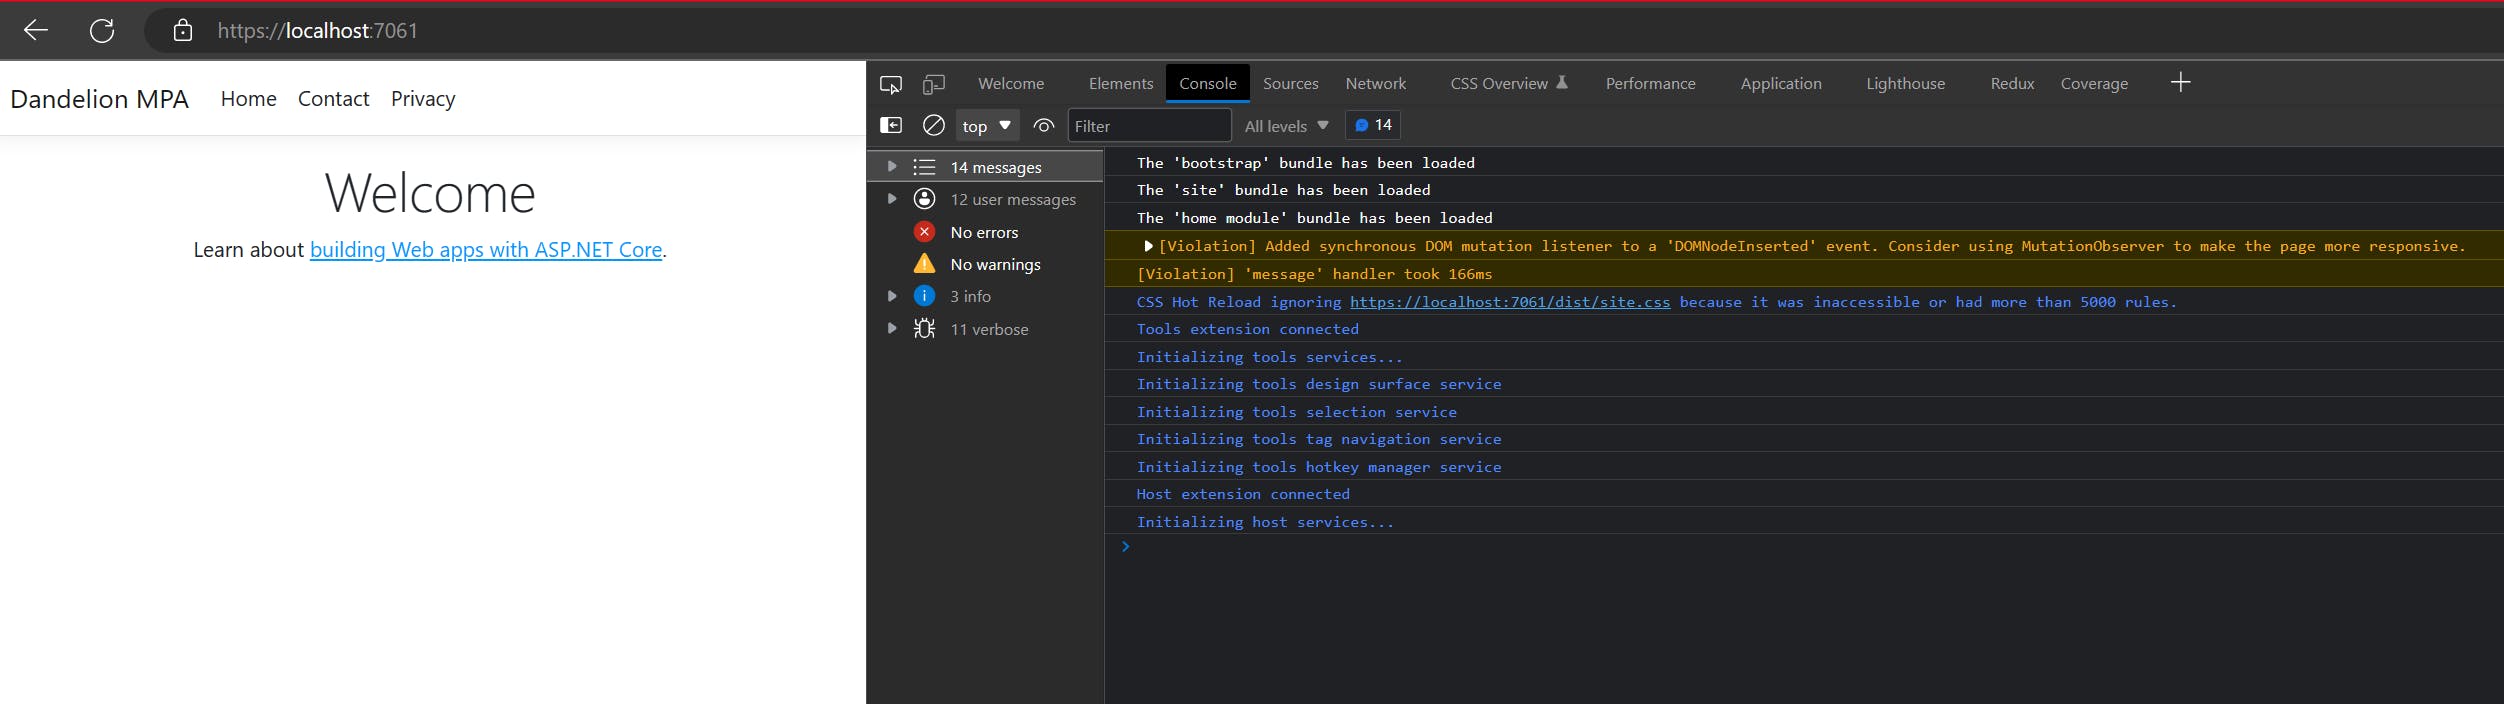
Use the terminal on ClientApp for executing the watch script of our package.json, for hot reload of the client app:
yarn watch
If everything goes well you should be able to see this:
But don't get frustrated otherwise, here I let you my repo with this code fully functional as a reference.
Hope this becomes helpful to someone out there!